
On one hand, kayak fishing is simple—all you need is a kayak, paddle, PFD and some tackle. On the other hand, it is a complex sport that calls for a diverse set of skills. To fish out of a kayak, an angler needs to know how to paddle, how to fish, how to rig his kayak and how to stay healthy on and off the water. In this installment, we asked expert anglers for their most rigorous rigging secrets.
10 Expert Rigging Skills to Level Up Your Game
1 Reel Clean
Fishing reels are high-tech, fine-tuned machines built to survive the worst elements. Still, a little maintenance will go a long way. Each time you use your reel, rinse it with a light spray of freshwater. It’s best to rinse your reels immediately after leaving the water. In my truck, I carry a garden sprayer filled with freshwater to spray off my reels, lures and other gear. A damp cloth will remove grime and fish goo. Never dunk a reel in water.
Once or twice a season, pull apart the reel and wipe grime off bushings and drag washers. Clean the bearings with a degreaser, wipe completely dry and reapply fresh grease. Drip a few drops of light oil on the spool bearings and coat the worm gears or one-way gears with grease. Wipe away all excess grease and oil—not only will it attract grit and dust, but it makes the reel and rod slippery, which could lead to an extra-long cast. To learn more about servicing and tuning your reel, visit tackletour.com.
— Brendan Bayard
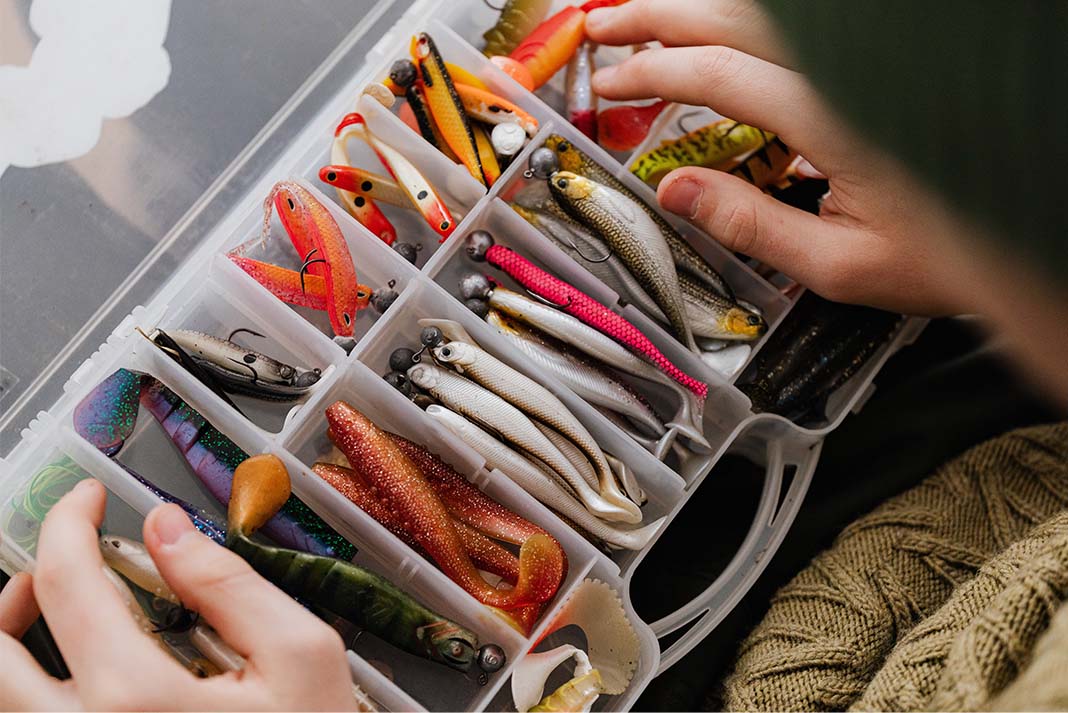
2 Tackle Your Tackle
Spend less time loading and unloading gear and more time on the water. Instead of carrying all of your rigs, lures, hooks and terminal tackle on your kayak, create a day box specific for the species and water you will fish.
Start with a tackle tray for each type of lure: topwaters, spinners, jigs, crankbaits, etc. Then, before each trip, fill an empty tackle tray with the lures you expect to use that day. Leave the tackle collection in the truck and take your tackle selection onto the kayak. This cuts down on weight, frees up space and keeps you from losing the family fortune if you capsize.
— Brendan Bayard
3 Carry the Load
Load as much gear as possible in the kayak before leaving the house. I transport my kayak upright so I can leave my seat and crate on the boat. I have added sealable pouches to my crate to hold small items such as sunscreen, bug spray and leader material. I installed a cockpit hatch to hold tackle trays below deck. Other items, such as scissors and clippers, are either clipped to the boat or stored in pouches so I can carry the loaded boat at highway speeds without losing my stuff.
I carry the rest of my gear in a duffle bag so I only make one trip between the car and the kayak. Smaller bags inside the duffel bag hold gear, electronics and lunch so I’m not hunting around for bits and pieces. A Velcro strap holds my rods together so I can easily carry them with one hand. After all, less time spent on land means more time on the water.
— Brendan Bayard
4 Think on Your Feet
Over the years, I’ve noticed many kayak anglers fishing barefoot. It’s really important to protect your feet against oysters and rocks, loose hooks and sharp fish teeth. There are many options for water shoes that have a fast drying upper and quick draining sole. Look for a shoe that has beefed up toe and heel protection and a non-slip footbed. EVA foam clogs, like Crocs, are quick to dry and maintain good traction when wet. Best of all, you can throw these simple shoes in a bucket of water with a couple ounces of bleach to clean and freshen them.
— Bob Bramblet
5 Line Management
The number one law of fly fishing is: if something can tangle your line, it will. Casting and working a fly leaves a lot of line lying on the deck. Stripping baskets or buckets are cumbersome and they take up space. Instead, I cover the deck with a damp towel. The towel covers any snags and stays in place in the worst wind. At the end of the day, I wring out the towel and throw it in a hatch.
— Chris Funk
6 Video Game Fishing
Fine tuning your fish finder will help you find more fish. In water less than six feet deep, I turn my sensitivity down. I only want large objects to show up on my screen since I’m looking for structural changes such as drop offs, humps or changes in bottom composition. As I paddle deeper, I turn the sensitivity up to mark fish and structure.
When I get on a piece of structure or school of fish, I’ll turn the sensitivity all the way up so I can mark my lure as it swims through the fish marks. I set the machine to display fish marks as arches, not fish symbols. Using arches, I can tell a school of bait from a single fish and even the type of fish.
I prefer a color fish finder because I can tell whether the bottom is hard or soft depending on the color and thickness of the bottomline on the screen. I often use a split screen, half traditional sonar (white background) and half down-imaging (black background). When I get on a school of fish or find a piece of cover to focus on, I will switch over to traditional sonar and turn off the down imaging.
Most of the time I set my sonar beam to use both narrow 50-kilohertz and wide 200-kilohertz beams to pick up small details and also give me a big picture of the bottom. I adjust my scroll speed to be faster when I am paddling and slower if I am anchored on a fish school or a piece of cover or structure. I’ll use bottomlock to get a better look at an interesting piece of structure that I mark on the bottom.
— Drew Haerer
7 Road Kit
For emergency repairs on the water, carry waterproof tape and a tube of Marine Goop. Pull the kayak onto shore, clean and dry the area, then fill the hole with Goop and let it cure. Cover the patch with duct tape and paddle back to the launch.
— Ben Duchesney
8 Up a Creek
Don’t get caught up a creek without a…well, you know. Carry an extra paddle and paddle leash on your kayak. Use the paddle leash when you are at anchor or drifting and there is a chance that the paddle could go overboard and drift away. When paddling long distances, a paddle leash only adds weight, remove it when the paddle is in your hands. During a surf launch or in rough water, a paddle leash can be a liability if you should get tangled underwater.
Smart kayak anglers always carry an extra paddle strapped to the deck or stored in the hull. Just be sure you can reach the paddle when you need it. To keep the extra paddle that is stored in your hatch within reach, attach a short piece of parachute cord between the paddle and the underside of the hatch cover. When you need the paddle, you can fish it out of the hull with the cord.
— Jeff Herman
9 Night Light
A headlamp makes night fishing possible. However, avoid shining the light on the water or in your friend’s eyes by turning it off when it is not in use. Try using a red light to maintain night vision. Supposedly, a green light does not spook wild animals. For added safety at night, purchase a battery operated red and a green LED light. Attach the red light to the port side (left, facing the bow) of the kayak and the green one on the starboard. Red and green running lights make your kayak more visible at night and discourages boaters from crowding your spot.
— Jerry McBride

10 Zip It
MacGyver had duct tape—modern tinkers use zip ties. These plastic straps come in a variety of sizes, colors and shapes, some can even be adjusted and reused. Kayak anglers should use black zip ties because they contain at least two percent carbon black to resist damaging ultraviolet rays. Here are five ways to use zip ties on your kayak.
- Connect a zip tie around your fishing rod ahead of the reel seat to make a lightweight plastic ring to attach a rod leash.
- In an emergency, zip ties make for a quick and cheap bow or stern handle. Just thread a zip tie through the broken handle and re-attach to the kayak.
- Use zip ties to secure a transducer cord to a transducer arm. Use a few more zip ties to coil excess transducer cord.
- Wrap up anchor rope and secure with zip ties to keep it untangled and securely stored.
- Never forget your clippers or hemostat again. Permanently attach them to the kayak within easy reach with zip ties linked together like a chain.
— Brad Wiegmann
This article was first published in the Summer/Fall 2013 issue of Kayak Angler. Subscribe to Kayak Angler Magazine’s print and digital editions, or browse the archives.
Feature photo: Houman Nikmanesh/Bixpy


Good tips – I started to take my gear a lot more seriously last year after I dumped my Kayak in a creek and lost a bunch of stuff. That was the catalyst, the event I needed to evaluate everything I had with me – and how I stored it!